Showing posts with label recipes. Show all posts

Thursday, August 29, 2013

Spicy Sweet Potato Home Fries

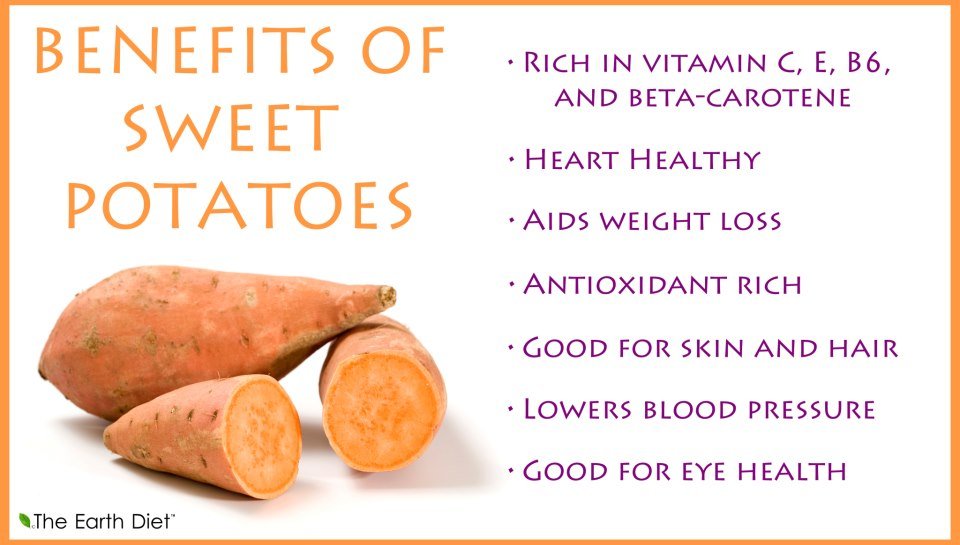
I've been a bit obsessed with sweet potatoes lately, but with all of these benefits, can you blame me?
[source]
This is the perfect side to any lunch, especially a lunch that you would usually eat chips or fries.

Spicy Sweet Potato Home Fries
Make this wrap! 1 tortilla [120 cals], 1 wedge laughing cow cheese [35 cals], 4 slices deli style lunch meat 
[56 cal], shredded lettuce [10 cal], sweet potato home fries [54 cal]
total for the whole lunch: 275 calories!

1 small sweet potato, peeled & cubed [54 cals]
1/2 teaspoon Lawry's low sodium seasoned salt
Red pepper flakes, to taste

Spray olive oil in a skillet on medium heat. Meanwhile, put potato cubes in a bowl and toss with seasoning. Add seasoned potatoes to the skillet and cook for 10-15 minutes [depending on how 'done' you want them, I like mine to have a slight crunch to them]. And Voila! There you have your spicy sweet potato home fries. Eat these plain [no ketchup!] or, if you must have something to dip them in, try 1 tbsp fage nonfat greek yogurt [14 cals] with a squirt of horse radish sauce. So good


Sunday, April 21, 2013

Sneaky Mom Meals

I think I've posted this recipe before, but I completely forgot about it. Adelei loves tots, and she liked eating these before, so I thought I'd try them again.

Ingredients:
Yield: 12-15 mini tots
  • 1 cup zucchini, grated
  • 1 egg
  • ¼ of an onion, diced
  • ¼ cup sharp cheddar cheese, grated
  • ¼ cup dry breadcrumbs
  • salt and pepper to taste
Pre-heat oven to 400 degrees. Grate zucchini on a paper towel, then use the paper towel to wring the water out of the zucchini. If you skip this step, your tots will be mushy, not crispy! Dice onion.
Put all ingredients in a bowl and mix. Spray a mini cupcake tin with olive oil and fill each hole until full.
Bake for 15-18 minutes!
That's it. Easy peasy.

Simple & Yummy. The proof is in the picture ;)

She loved them! Definitely going to be making these more often. The best part? They're not just toddler food. So go ahead and whip up a double batch for the whole fam. They're so delicious, you won't feel guilty indulging.


Tuesday, April 16, 2013

Sweet Indulgence

Counting Calories can be fun and all [especially when I'm seeing results!], but it can also be annoying. Like when I have a hankering for a frappe, but realize that there's almost as many calories in one little cup as there was in my entire lunch [300 calories in a 12 oz caramel frappe from Starbucks]? That's annoying. But realistic. So when I want to cheat these days and have a sweet coffee treat, I came up with a little something to fit my needs. Not only is it less calories, but it's also budget friendly because it uses ingredients that I always keep on hand!


4 frozen coffee cubes*
12 oz almond milk
1/4 cup vanilla frozen yogurt
fat free whipped cream [optional]

Take your frozen cubes* and put them in the blender with your frozen yogurt and milk, blend for 10-15 seconds or until there are no large chunks of ice left. Pour into your favorite glass and top with whipped cream!

Not only is it deliciously rich and creamy, but it couldn't be easier to make!

Here is the calorie breakdown:
coffee cubes - 2 cal
almond milk - 120 cal
fro yo - 35 cal
whipped cream -  5 cal
Total: 162 calories

Looking for less calories than that? Try using 8 oz of almond milk [80 cal] with one less ice cube & you'll have a smaller treat with the same great taste for only 122 calories!


*To make the frozen coffee cubes, just brew your favorite coffee and once cooled, pour into an ice tray. Freeze for 2-3 hours or overnight.
If you're going to add any sweeteners, do so while coffee is still hot [just be mindful in doing so, as you're adding calories!]. Six cups of brewed coffee for me made two trays of coffee cubes.

Monday, April 15, 2013

A Better Breakfast

From time to time, I get burnt out on drinking shakes for breakfast. When that happens, I look for something low in calories while also being delicious and filling.

That's how I discovered this treat:
It's so simple. Honey Wheat Toast with Almond Butter and Honey Drizzle. So. Good.
I've been pairing this with a banana and 8 oz of 2% milk for a total of 395 calories. That may seem a little on the high side, but it keeps me full until lunch. No mid morning snacks for me!

What's your favorite healthy breakfast?

Sunday, April 14, 2013

Sneaky Mom Meals

I always say that my daughter was born hungry, because, well...she was.
While I was being sewn up, the nurses fed her an ounce of formula, and from what I've heard, she sucked it down in no time.
My sweet girl, she's always had a good appetite. She's pretty much always eaten anything I've put in front of her.
Until lately...
For the last few weeks, she hasn't been eating very much. Even her favorite foods [spaghetti and chicken nuggets!] have been pushed to the side [or thrown on the floor]. She isn't being very receptive to 'new' foods, either. Do you know how frustrating that can be?
Very.
Anyway, I've been trying to find ways to get her the nutrients that she needs while masking it with something 'fun' so she doesn't immediately start demanding to get down from her high chair [yes, she does that.]

Here's my first try:
Cheesy Carrot Quesadilla
It's as easy as it sounds and it was a huge hit.

1 Carrot, shredded
1/4 cup Cheese
1 whole wheat flour tortilla

Shred a carrot [or 4 baby carrots]. I just put them in my food processor for a few seconds, and it was perfect. Heat a skillet on medium, using olive oil spray or a little bit of butter to help it brown. Add the quesadilla, carrot, and as much or as little cheese as you think is appropriate for your child. I used very little (1/4 cup) since Adelei already has digestive issues. Once the cheese has melted, just fold the tortilla in half and cut into 4 triangles. Wa-La! I served it with a side of raw carrots and homemade ranch dip.


I know I can't be the only one going through this phase, so I decided to document it, in the off chance that someone else just as frustrated may come across it. If you have any sneaky mom meals, feel free to share them! If you take a picture of your sneaky mom meal, use hashtag #sneakymommeal on instagram or twitter. Let's help each other out!

Thursday, January 3, 2013

Salted Caramel Cake Pops

Last year, my dear hubby introduced me to the salted caramel mocha from Starbucks, and I became obsessed
More recently, my sister introduced me to the salted caramel cake pops and I couldn't believe how amazing they were. I found myself craving them, but they're kind of expensive, so I wanted to try to learn to make them myself.

Alas, here is my version of the salted caramel cake pops, inspired by starbucks.


1 box chocolate fudge cake mix
2-3 tbsps chocolate frosting
1 cup semi sweet chocolate chips
1/2 cup white chocolate chips
1/4 cup caramel melts
kosher salt

optional:
heavy cream
butter

Make the cake mix according to directions. Bake & allow to cool completely before you begin creating the balls. Break cake up into tiny pieces into a large bowl (this should be super easy since the cake is fresh and moist). Add frosting a tablespoon at a time. Less is more. You don't want the balls to be so moist and sticky that they don't stay together. Once you have a nice, firm consistency  let the mixture rest for 10-15 minutes. Roll mixture into 1 to 1 1/2 inch balls and place on a wax paper covered sheet tray. Once all balls are formed, place in the refrigerator for 30-45 minutes in order to firm. [Optional: dip sucker sticks in melted chocolate before inserting into the middle of the balls.] 


After balls have hardened, put chocolate chips in the microwave in 30 second intervals until completely melted. Dip each ball with the chocolate and tap to get rid of excess chocolate. Allow to dry [10-15 minutes]. Melt white chocolate in microwave in 30 second intervals until completely melted. Melt caramels the same way. I found that the caramels didn't get as soft as I wanted, so I added a tbsp of butter and a tbsp of heavy cream and microwaved until it was a smooth consistency. Put a dollop of white chocolate on each pop. Then put a dollop of caramel on top of that. Add a sprinkle of kosher salt and refrigerate for 30-45 minutes.


They aren't perfect, but they taste like heaven. I promise, they're so good, you won't regret the time it takes to make! Plus, take these to a party and you'll really impress your friends!

During this process, though, I did find a few things that I want to change next time. Instead of chocolate chips, I want to use candy melts. From what I hear, the consistency is a lot thinner and would be easier to work with. I also want to create my own caramel frosting to use in the mixture rather than chocolate frosting to add more of a caramel flavoring. Lastly, I'm going to use coarse sea salt in place of kosher salt. My hubby said these didn't have enough salt on them to truly be called salted caramel. So there you have it!

Do you have any fun ideas or tips for cake pops?

Sunday, September 16, 2012

The Best Buns Ever

A few weeks ago, while on a thrifting trip, I picked up this bad boy.
It was practically brand new. 
Probably a wedding gift that was never used.
The inside was flawless & the outside was almost just as perfect, 
minus a few blue scratches. 
I made a $15 bet that it would work, and [not so] patiently drove the 10 minutes back to my house.
As soon as I got inside, I plugged it up & wa-la! It lit up like a Christmas tree.
I was ecstatic.
I immediately got online to download the user manual & get recipes.
The next morning I went out to get ingredients so I could begin my bread baking adventures.

Because of my resolve to become healthier, I have greatly limited my bread intake.
But, when I do have bread now, I don't feel bad about it.
I am making my bread fresh, free of nitrates and preservatives.

Not only do I feel like I'm doing something great for my family, but I'm also saving a lot of money!
Never again am I going to spend $3 for a pack of hamburger buns that are going to sit on the shelf and get moldy before I use them all. I'm not going to buy canned cinnamon rolls because I can make them for half of the price & they taste so much better. I will not buy Sister Schubert's rolls [even though they are delicious!] because now that I know how to make them, it is so much cheaper. And [dare I say?] better.

I'm taking you on my bread baking adventures.
You do not need a bread maker. 
The $10 you spend on ingredients will likely make a few loaves of bread, cinnamon rolls, yeast rolls, and buns. Trust me, a bag of bread flour and a jar of yeast will go a long way.

Our first stop--
The Best Buns Ever...
Seriously.

I used this recipe.

1. Put all of your ingredients in your bread maker & turn it on. Walk away & let it do it's magic.
If you do not have a bread maker, you can do this with a mixer, you just need to stand and supervise.
2. Once dough has risen for the first time, dump it out of the bread maker [or mixer] and onto a lightly oiled surface. Separate into buns. HINT: make them smaller than fist size. They will rise again & if you make them any larger you will have ginormous buns. When you get them separated, cover with a cloth in a warm area [I do mine on top of the stove while it's preheating] and leave to rise again. Do NOT skip the second rise.
3. Risen buns, pre-tan. Lather them with an egg wash, sprinkle on some sesame seeds if you're feeling fancy.
4. Bake at 400 degrees for 15 minutes, according to the directions. It's 12 minutes to perfection in my oven, so just keep an eye on them.

I have made these on 3 separate occasions. Two of those times, we have had company & I got rave reviews.
Try them. It might take a little time out of your day, but I promise you it's worth it.
You can thank me later.
Friday, September 14, 2012

The Easy Way & A New Shake

I've been back on my shake routine for a little over a week now, and I've been looking for more convenience. My spinach doesn't really hold up for very long, and I'm not a fan of going to the grocery store more than once a week. So, I decided to make spinach cubes & keep them in the freezer.
Not only does this keep the spinach from going bad before I'm able to use it all up, but it also saves a lot of time in the morning.
If you have a full size blender, I would definitely suggest using that when making the cubes.
All you need is
1/2 cup 2% milk
1 bag of spinach
Ice cube trays or a mini cupcake tin
 Pour all of the milk in the blender & fill the rest with spinach. If you're using a full size blender, I would suggest still adding just a handful of spinach at a time so you don't over work the blades. It's basically going to look like spinach milk. There is no thickness to this whatsoever.
Once it has blended down, add more spinach & blend again.
 Disclaimer: This process may not work as well if you don't have a super cute helper. ;)
 If you're using a mini blender, you will have to dump some of the liquid before you can continue with the rest of the bag. I had to do this twice. But the steps are pretty simple. Just keep about half full of liquid, half full of  spinach until you're done with the entire bag.
 Then pour it neatly into ice trays or a mini cupcake tin. If you don't use ice trays, you need to lightly spray the surface of the cupcake tin with nonstick spray.
 Pop them in the freezer over night & they will be ready to go in the morning!
I use 3 cubes in each shake. This process, for me, made 8 days worth of cubes.
When you pop these out of the molds, store them in a freezer bag to take up less room.

And as promised, a new shake recipe.
Here's the old one, in case you missed it.
I got tired of bananas.
I tried a few other fruits, but none that were blog worthy.
This, though. This is heavenly.
I can see myself drinking this for a very long time.

1/4 cup Low Fat Vanilla Yogurt
[use vanilla greek yogurt for a creamier shake]
1 tbsp peanut butter
8 oz 2% milk
1 tsp honey
dash of cinnamon
3-4 spinach cubes
4-6 ice cubes

Put all ingredients into blender & blend until frothy.
Milk & honey? I told you it was heavenly. Just try it. Don't be scared of the spinach.
If you're worried that this won't hold you over until lunch, don't be.
It will, unless you're doing a lot of activity.

What is your go to shake recipe? Even though I love, love, love this one, I'm constantly looking for new ideas!

Monday, August 13, 2012

Easy Chicken Salad

I've found that if I have my lunch planned out [or even made!] for the week, I am less likely to eat a bunch of junk. One of my go to lunch recipes is this easy chicken salad!
Ingredients:

 2 Cans chunk chicken [drained]
1/2 bag craisins
1/2 bag glazed walnut pieces
Mayo

In a large bowl, add chicken. Use a fork to shred chicken before adding other ingredients. Add craisins and walnuts. I start out by adding 1/4 cup of mayo. I love mayo, so I always end up adding more, but this is a good starting point. You want it to be moist, but not drenched. Pair it with bread for a sandwich, or with lettuce & crackers for a healthier alternative! It's ready to eat as soon as you make it, or you can let it sit in the refrigerator over night to let the flavors merry.


The best part of this recipe [other than being so simple & delicious] is that you can easily adjust the proportions depending on your preferences. Don't like cranberries? Add raisins or apple chunks. Don't like walnuts? Add pecans or almond slivers.

Another perk of this recipe...you get 5-6 lunches out of this for just $5.08 *
Here's the breakdown:
2 Cans of Chicken $1.59 each
Bag of Craisins $1.29 [.65 cent for amt used in this recipe]
Bag of Glazed Walnuts $2.49 [$1.25 for amt used in this recipe]
*I didn't add mayo into the price bc that is an ingredient most people have on hand.

There you have it. 
Cheap, easy, delicious. Can't beat that! 
Enjoy!

Saturday, August 4, 2012

The Green Monster

Have I ever mentioned my dislike for eating breakfast?
It's not that I don't like breakfast food, I just don't like making breakfast for just me. 
And quite honestly, I don't usually 'feel' like eating until noon-ish.
Since I'm trying to lose weight, I'm trying to make sure I eat [or drink] something first thing in the morning to get my metabolism going.
Hello, smoothies!
I find it a lot easier for me to drink a smoothie than to eat a bowl of cereal.

While on pinterest a few days ago, I saw a recipe for a green monster smoothie.
I had never heard of it before, but just reading the benefits of it, I decided to try it.
Being a spinach lover, I wasn't skeptical at all and I'm so glad!
Although I use 2 handfuls of fresh spinach, I can't taste it at all [hint, hint spinach haters!]

1 sliced frozen banana
1 tbsp peanut butter
 1/4 cup Low Fat Vanilla Yogurt
2 % Milk*
2 handfuls of spinach

Tip: I never buy frozen fruit at the store. I always buy fresh , wash/prepare it myself, & separate by serving size into freezer bags. It takes maybe 5 minutes of my time, & I get way more bang for my buck that way.
 Start out with the frozen bananas, add the peanut butter.
 Next, add your yogurt & milk
 Should be about half full before you add the spinach

 I add 1 handful of spinach & then blend for 30 seconds. Once it is smooth, I remove the cap, add more spinach & milk, and blend for another 30 seconds.


The finished product! This is such a rich, creamy smoothie. It's packed full of healthy goodness, but you wouldn't know it by tasting it...it tastes like a treat! I'm definitely looking forward to experimenting with different variations soon.

*Note: I didn't put a measurement for milk. The main reason for this is because you don't want a really watery  smoothie, you want it creamy. I just add a little bit of milk at a time until it gets to the consistency I like & I would suggest that to you as well.

Monday, July 9, 2012

The Best French Bread Pizza...Ever.

French Bread pizza is one of my absolute favs.
My love for it started a long, long time ago when I was having a sleep over at a friends' house.
Her mom made us French Bread pizza pretty much every time, but I wasn't complaining because it was good.
Fast forward to today. Hubby said he wanted pizza for dinner, only it's Monday, and I hate starting out my week not cooking [I know I'm so, so weird].
Anyway, so while I'm making my rounds at the commissary, I smell the fresh baking bread as soon as I walk in. I immediately think of French Bread pizza.
I stroll over to the racks to see tons of fresh french bread, and just a few loaves left of fresh garlic bread.
My mouth starts watering immediately. This is how I knew it was a great idea.
I finish my shopping, getting enough food for the rest of the week, and head home.
I'm literally thinking about this pizza all day long.
Even to the point where I exercised for longer than normal, just so I would feel less guilty about it.
And then I get a call from Aaron saying he was on his way home.
AKA time to start dinner.
Look at this perfection:
I swear this picture doesn't even do it justice.
 There are not enough words in the English language for me to describe how amazing this was [delicious + cheap + easy, what more can you ask for?]. In fact, we're most likely not going to be getting delivery any time soon.
The best pepperoni, ever.


We paired it with a salad, and I know I've used this phrase do describe pretty much everything in this post, but this is seriously the best dressing....ever.

Are you drooling yet?
Here's how you can make you're own. You're welcome.

1 loaf of fresh French Garlic Bread
1 can [or jar] of Pizza Sauce
1 8 oz bag of Mozzarella Provolone Blend Cheese
1 bag Pepperoni [I chose the kind made for sandwiches, bc I like it better]
Other toppings optional [I prefer my pizza 'plain' i.e. sauce, pepperoni, cheese. The Hubs likes his loaded..
olives, mushrooms, jalapenos. You name it, he will eat in on his pizza.]

Preheat oven to 400 degrees. It's very important that you do this first so it will be very hot when you put the pizza in [unless you like soggy bread]The bread should already be cut in half length wise, so just cut it in half width wise. Spray a cookie sheet with nonstick spray & place the bread crust side down. Spread as much [or as little!] of the pizza sauce on the bread. Cover with as much cheese as you like. Add as many pepperoni slices as you want [I used 3 per piece, using a total of 12]. Add any other toppings & then sprinkle just a tad more cheese on top to hold everything in place. Stick it in the oven for 10-15 minutes.
This easily feeds 4 people. Possibly more if you also fill them up with salad!

If you try this, and I know you will, let me know how it works out for you!
Enjoy!

Wednesday, May 23, 2012

While I'm Away, Another Recipe ;)


Y'all know I love a good recipe! So here is Mrs. Duh letting us know how to spice it up ;)
--------------------------
I’m Mrs. Duh from The Misadventures of Mrs. Duh. I’m an Air Force Wife, graduate student, Crossfit newbie, and all-around quirky gal. One thing that I love to do is find delicious, healthy recipes! I’m happy to be guest blogging on This Is Me; Consequently, so I can share one of my favorites!

This is a recipe that was given to me by my mother, who is an avid Crockpot cooker. She is one of the busiest women I know, so the Crockpot always serves her well. It allows you to make delicious meals and not waste too much time in the kitchen. Mango Habanero Pork Chops are no exception! This recipe requires very little hands on preparation and tastes amazing! I know it has “habanero” in the title, but don’t be scared… it’s not too spicy!
Here is the recipe:

Mango Habanero Pork Chops

Ingredients:
-          4 boneless pork chops
-          1 habanero pepper, finely chopped (for less heat, don’t add the seeds)
-          1 small onion, chopped
-          ½ cup ketchup
-          1 Tbsp. brown sugar
-          15 oz. canned mangoes with syrup (I use Sunfresh brand, they are in a glass jar and usually found in the produce section… if you can’t find mangoes, canned peaches work well)

Directions:
1. Place pork chops in slow cooker. Poke a few holes in each with a fork.
2.  Mix all other ingredients in a bowl, coarsely mash the mangoes with a fork (you want big chunks), and pour over pork chops.
3. Cook on low for 5-6 hours.
4. Shred pork in slow cooker with a fork.
5. Serve over white or brown rice.
6. Enjoy!

Serves 4; Calories - 345; Fat – 13.1g; Carbs – 13.5g; Protein – 40.8g

Sunday, May 20, 2012

While I'm Away; A Fave Recipe


Since I'm currently overwhelmed with the moving process, I asked a few lovely ladies to guest post for me. Each day they will be sharing with you something they enjoy! So without further ado [don't miss me too much ;)]
------------------------------

Hello Awesome Bloggers!! 

I hope you are all having a wonderful week. I heard Jamie needed some people to do a guest post for she is in the process of moving and we ALL know how difficult that is so I'm so excited she is letting me do a guest post. Without further ado I will tell you a little bit about me.
 My name is Stephanie I'm 24 eeekkkk I feel so old. I am a mother to a Fur baby and my husband at times when he acts up haha only joking. My husband is in the Army and we are stationed here in good ole Colorado my husband and I were both raised in Panama City,FL man do we miss the ocean. But its not to bad here just a little cold during the winter and well ok I can't lie its cold all the time here. When my friends and I get together we try to trade recipes and if any of you like soups when its cold out I PROMISE you will LOVE this soup.(We cook it at least once every two weeks) yeah its that delicious..Its called Chicken Enchilada Soup and you can cook it on top of the stove or in a crock pot my personal opinion is do the CROCK POT I think it turns out better. But to each its own. 
Below I have copied the recipe to share with you all. PLEASE LET ME KNOW HOW YOU LIKE IT. I have also posted a picture of it in the crock pot. 

Thank you Jamie for letting me guest post I hope your move goes smoothly.
You can catch me over at Army Wife On A Mission. 

Chicken Enchilada Soup

3 cups chicken stock
2 skinless, chicken breast
2 tsp ground cumin
2 tsp ancho chili powder
1/2 tsp cayenne pepper
1 28 oz can diced tomatoes
4-6 jalapeno peppers, minced
1 green bell pepper, diced
1 large onion, diced
4 cloves garlic, minced
1 15 oz can black beans, rinsed and drained
2 cups frozen corn
1/2 cup tomato paste
8 oz cotija cheese, crumbled
8 oz pepperjack cheese, divided
1 cup cilantro, chopped
Tortilla chips

In a large Dutch oven or stockpot, add chicken stock and heat over medium heat. Add chicken breasts, cumin, chili powder, and cayenne pepper. Simmer about 20-25 minutes until chicken is cooked through. Remove chicken and set aside. Add tomatoes, jalapenos, bell pepper, onion, and garlic to the pot. Simmer about 30 minutes, covered until tomatoes have begun to break down. Add black beans, corn, and tomato paste and stir to incorporate. Add cotija cheese and half of the pepperjack cheese and stir to melt. Return chicken to soup and cook about 20 more minutes until desired consistency. 
If soup isn't as thick as desired, you can add strips of flour tortillas. They will dissolve into the soup to thicken the broth. Add cilantro, reserving some to top individual bowls if desired. Ladle into serving bowls and top with crushed tortilla chips, reserved pepperjack cheese and cilantro if desired.


Love
Stephanie

Saturday, April 14, 2012

Key Lime Cupcakes


It's practically summer time here down south, which means it's time for sweet tea, sunshine, and key lime pie.
Or in this case, cupcakes.
I have been craving anything key lime flavored for weeks, so I finally just took the initiative to make it myself.

Using this recipe from Betty Crocker, I made these delicious little devils.
They're the perfect combination on sweet & sour. And the cream cheese frosting mellows it all out. Seriously delicious.
What are you craving for the summer season?

Monday, October 17, 2011

The Best Turkey Burgers, Ever.

Until recently, I wasn't a huge fan of turkey.
Mostly because every time I've had it,
it has been bland and dry.
But since I've decided I wanted to start eating healthier,
I've been using turkey in the place of ground beef.
Not only is it healthier, but also cheaper.

Once I had my mind made up that I was going to start eating turkey more,
I had to find ways to make it appealing.
So I tried, and succeeded.

Introducing
French Onion Turkey Burgers
[aka the most moist & delicious turkey burgers in the whole world]

1 lb of ground turkey
1 pkg french onion soup mix
1/4 cup of water

Mix all ingredients together in a medium size bowl [I like to use my hands and squeeze it all together to make sure that the seasoning gets thoroughly soaked into the meat]. Cover with plastic wrap or foil and allow to set in fridge for at least an hour. DON'T skip this step! This allows the meat to soak up the seasoning and the water, allowing for super moist yummy burgers. If you skip this, you are setting yourself up for burgers that will crumble apart. After all the flavors are married ;) form your patties. I like to use a George Foreman grill, but a skillet works fine, too. Cook to desired doneness. [Usually 6-7 minutes]. I like to put them on kaiser rolls topped with a little mayo, lettuce, & mozzarella cheese.

{Yields 4 burgers--recipe can be easily doubled}

Try them out and send me feedback!

Saturday, August 20, 2011

Put some SPICE in your life

All during my pregnancy, I craved anything & everything spicy.
I couldn't get enough.
While most of my cravings subsided since I had the baby, this one did not.

The newest way to get my fix?
Jalapeno Popper Dip.

Ingredients:
8 oz pkg cream cheese, room temp
1/2 cup cheddar cheese, shredded
1/4 tsp garlic powder
4 bacon strips, cooked & chopped [OR you could use bacon bits!]
1/4 cup canned green chiles
2 fresh jalapenos, chopped & w/o seeds
Fresh Parmesan Cheese to top [optional]
Salt & pepper to taste

Directions:
Mix all ingredients together thoroughly [make sure there is NO lumps in cream cheese!] in large bowl. Spray baking dish, scoop all ingredients into dish, top with parm. cheese, & bake at 375 for 30 minutes. Serve with crackers or tortilla chips.

*I used chicken flavored crackers & it was AMAZING! It's cheap & very easy to make. Seriously, try it & let me know what you think.

Tuesday, August 16, 2011

Taco Tuesday...sort of.


Often times, when I want to make something but am not sure how, I'll look up a recipe.
The first time, I will try the recipe exactly as it is written.
If I give it a chance and love it, I'll keep it the same. If I just like it, I improvise the next time.
That's what happened with this recipe. I've made it several times going by the recipe, but today I decided to change things up.

Here is my version of
Fiesta Chicken Enchiladas


Ingredients
2 green onions, chopped
1 clove garlic, minced
1 lb. cooked boneless skinless chicken breasts, cubed
1 pkg taco seasoning [hot or mild]
1/4 cup water
4 oz. (1/2 of 8-oz. pkg.) PHILADELPHIA Cream Cheese, cubed
1 cup KRAFT Shredded Cheddar & Monterey Jack Cheeses, divided
3 cooked bacon strips, chopped
1/2 of an avocado, cubed
4 large flour tortillas

Directions
HEAT oven to 350°F.

HEAT large skillet spayed with cooking spray on medium heat. Add onions and garlic; cook and stir 2 min. Add chicken, cream cheese, taco seasoning & 1/4 cup water; mix well. Cook 5 min. or until heated through, stirring occasionally.

SPOON about 1/4 of the chicken mixture down center of each tortilla, add avocado, green onions, & bacon pieces; roll up. Place, seam-sides down, in 13x9-inch baking dish sprayed with cooking spray; top with shredded cheese.

BAKE 15 to 20 min. or until heated through.

Add toppings such as sour cream, guacamole, tomatoes, lettuce, & onions.

Saturday, May 28, 2011

Food for thought?

Since Aaron has been back, I've been cooking A LOT.
I'm not even going to lie. The entire two weeks he was gone, I didn't cook. Not once.
I relied on frozen dinners, fast food, and sandwiches [don't judge me!]
I just hate cooking for one.

When he came back, though, I didn't just want to make the same ol' things I'd been making for the past few months, so I spent some time recipe searching.
Here are a few of my favorite NEW recipes:
The Marlboro Man Sandwich
Southern Style Corn
Cajun Chicken Pasta
Knock You Naked Brownies

Seriously, all of these recipes are delicious and really cheap/easy to make. Spoil yourself and try at least one.

Sunday, December 5, 2010

Mmmm

Lately, I've been thinking a lot about Lumberjack potatoes.
They're my favorite breakfast food, ever.
The problem is the only place I can get them is an hour away...So I probably only get to eat them like twice a year.
Anyways, I decided it was time for me to make them myself.
It can't be too hard, right?

So here are the ingredients:
1 lb frozen hash browns
1 green bell pepper, chopped
1 medium onion, chopped
1/2 cup to 1 cup of shredded cheddar cheese
1 garlic clove, minced
cubed ham
salt & pepper to taste
1 tbsp butter


In a large skillet, add hash browns. Use a spatula to flatten. Cook according to package.

In a different skillet on medium heat, add butter. Once melted, add onions and bell pepper. Add garlic after vegetables have softened. Cook for 2-3 minutes. Add the already cooked ham just long enough to be heated through.

When the hash browns have almost finished cooking, add the ham and vegetables. Cook for 2-3 minutes. Turn off the heat & add the cheese.

This stuff is so amazing, that we ate it up before I realized I forgot to take a picture [sorry!].

Monday, November 29, 2010

This stuff is amazing...


This month's issue of Food Network magazine has SO many good recipes in it. I mean, it usually does, but there is just something about holiday recipes that just really make me want to get in the kitchen.

As soon as I saw it, I knew I had to try it.
As soon as I tasted it, I knew I had to share it.

source

Warm & Creamy Bacon Dip

8 oz softened cream cheese
2 cups sour cream
3 oz bacon bits
2 cups cheddar cheese
1 cup chopped green onion

Preheat oven to 400 degrees.
Mix all ingredients in a large bowl. Make sure there are no big clumps of cream cheese. Pour into a 1 quart baking dish. Cover with foil. Bake for 25-30 minutes.

I served it with Chicken in a Biskit Crackers.
SO GOOD! Perfect for the upcoming holiday parties!